Wednesday, November 4, 2009

Updates On My Being MIA!!!!

Sorry I have been away awhile from my blog. I have been dealing with some personal issues that made me be away. I am back I am working on some new tuts. I will have them posted up on my blog really soon. Thank you all for understanding. I am really hoping to get the holiday started out right. I have some great ideas for what I want to do for the thanksgiving and christmas tuts I have planned. I just hope you will enjoy them. I realize this year is just about gone. I have lots of tut ideas for the upcoming year also.
Hugs,
Hunne

Thursday, August 13, 2009

Special Kisses

Image and video hosting by TinyPic


Special Kisses


This tutorial was written for those with the working knowledge of PSP.

Supplies Needed:

PSP 10 (or any version will work)
Tube of choice
I am using the artwork of ©Jamie Kidd wwwjamiekiddart.com which can be purchased here at CILM. Do not use this her artwork unless you are a licenses hold with CILM.

Template 23 at HunneDesigns Scraps here.

Scrap kit called "Little Kisses" by Fantasymoments here.

Font of Choice. I am using "Romance Fatal"

Filters used:
Eye candy 4000-gradient glow

Dropshadow used in this tutorial. V&H 2, Opacity 50, Blur 5.00, Color-Black.

Let's get started:

Open template #23. Shift-D then close original. Delete the watermark. Image-Canvas Size 850X850. Can be resized at the end.

Click on raster 2. Selections-select all-float-defloat. Open paper 20. Copy-paste as a new layer-Selections-invert-delete. Delete raster 2. Duplicate-back on original. Adjust-Blur-Gaussian Blur-30.

Click on raster 3. Selections-select all-float-defloat. Open paper 8. Copy-paste as a new layer-selections-invert-delete. Delete raster 3. Use gradient glow on this layer.

Click on Raster 4. Selections-select all-float-defloat. Add a new raster layer. Flood fill with color from your tube. If using same tube...use this setting in your color palatte. #d683af. Select none. Delete original raster 4.

Click on frame layer. Using magic wand click inside the frame. Selection-moditify-expand 2. Copy-paste as a new layer-selections-invert-delete. Do this a total of three times...if using this tube. Dropshadow.

Add any elements of your liking. Or look at my tag for example. Be creative.

Add copyright info. Save as a png or jpg.

Thank you for trying this tut. I hope you enjoyed it. I enjoyed making it. This tut was created on August 13, 2009 by Hunne Designs.


Friday, July 31, 2009

Summer of Colors

Summer of Colors
Image and video hosting by TinyPic


This tutorial was written for those with the working knowledge of PSP.

Supplies Needed:

PSP 10 (or any version)
Tube of choice
I am using the artwork of ©Elias Chatzoudis www.elias-design.gr which can be purchased at MPT here. Do not use this his artwork unless you are a licenses holder with MPT.

Template "Framedup" by Scdesignz, which you can find here.

Scrap kit called "Summer Melon" by Fantasy moments here

Font " Aspire" which is a free font. Or font of choice.

Filters Needed
Eye Candy 4000-Gradient glow

Dropshadow used in this tutorial. V&H 2, Opacity 50, Blur 5.00, Color-Black.

Let's get started:

Open template. Shift-D to make copy. Close original. Image-Canvas-Size 750x750. Can resize later.

Click on raster layer 2. Selections-select all-float-defloat. Open paper 29. Copy-paste as new layer-selections-invert-delete. Select none. Delete raster layer 2.

Click on Copy of Vector 1. Apply gradient glow with this settings. Width-3.00, Corners-0, Overall-100, Color-Black.

Click on raster 3. Selections-select all-float-defloat. Open paper 21. Copy-paste as a new layer-select-invert-delete. Select none. Delete raster layer 3.

Click on Copy of vector 1. Add gradient glow like above.

Click on raster 5. Selections-select all-float-defloat. Open paper 10. Copy-paste as new layer. Selections-invert-delete. Select none.

Click on copy of vector 1 (which is just below the frame). Apply gradient glow like above. Then add dropshadow.

Click on magic wand, click on back on raster in which you added your last paper. Click on the first square. Selections-modify-smooth, with these settings. Amount-3, Corner-5, check anti-alias and Preserved corners. Click ok. Copy-paste as new layer your tube. Selections-invert-delete. Select none. Do this same step two more times with the other two squares.

Click on raster 4, which is the circle dots. Add dropshadow.

Copy & paster your main tube. Making sure your on top layer. Resize if needed. Add dropshadow.

Add an elements of your liking. Dropshadow.

Add your name. Copyright info. Layers-merge-visible. Same as a jpg or png.

I hope you enjoyed this tutorial. I enjoyed making to for you. Created by Hunne Designs on July 30, 2009.


Wednesday, July 22, 2009

True Blood

Image and video hosting by TinyPic
True Blood


I decided to do this tut...since many other tut writers are doing Twilight.
I don't have anything against Twilight. Move over Edward there is a new vampire
in town. I so love watching this Series. I have not yet read any of the books.
But the series rocks. So the show inspired me to write this tutorial for you.

This tutorial was written for those that have the working knowledge of PSP.

Supplies Needed
PSP 10 (or better)
Tube/Images of choice
I am using the images from the series I found throught the net.

Scrap kit "Bad Things" created by Rainy Day Scraps here.

Mask "WSL_Mask7" created by Weescotslass Creations here.

Font of choice.

Filters used:
Eye Candy 4000-gradient glow

Dropshadow I use for this tut is: V&H 2, Opcacity 50, Blur 5.00, Color-Black

Let's get started:

Open transparent image 750x750. Can resize later. Open paper 3. Copy-pastes as new image. Apply mask-Sources luminance-Fit to canvas-Hide all mask-make sure Invert is uncheck. Merge group.

Open Frame 3. Copy-paste as new layer. Grab magic wand, click inside frame. Make sure to press shift when using magic wand to get all the area insid the frame. Selections-Modify-Expand 2. Open paper 2. Copy-pastes as a new layer-selections-invert-delete. Open tube/image. Copy-paste as new layer-delete. Select none. Move paper and tube below frame. Dropshadow frame.

Making top layer active. Open flower 3. Copy-paste as new layer. Resize 50. Move to bottom left corner. Dropshadow.

Open flower 2. Copy-paste as a new layer. Resize 50 then 75. Move to bottom left corner next to other flower. Dropshadow. Do the same thing with flower 1.

Open keychain 2. Copy-paste as a new layer. Resize 65. Move to lower right corner. Dropshadow.

Open wordart 2. Copy-paste as a new layer. Move to the top of tag. Apply gradient glow & dropshadow.

Open blood splatter 4. Copy-paste as new layer. Move to bottom. Dropshadow, duplicate-mirror.

Add name and info. Layers-merge-visible. Save as a jpg or png.

I hope you enjoyed this tutorial. I enjoyed making it for you. Tutorial was written by Hunne Designs. Made July 22, 2009.


Tuesday, July 21, 2009

Good Girls Wear Pink


Image and video hosting by TinyPic

Good Girls Wear Pink


This tutorial was written for those that have the working knowledge of PSP.

Supplies Needed:
PSP 10 (or any version)
Tube of choice
I am using the artwork of ©Keith Garvey www.garvgraphix.com which can be purchased at MPT here. Please do not use this artwork without the proper license.

Template #8 by Hunne at Hunne Scrapkits here.

Mask WSL_Mask7 by weescotslass creations here.

PTU scrap kit called "GirlyGirl" made by Ziggy at ZiggyFan Scrap Designs which you can find it here.

Font: I am using aka Dora (or font of your choice)

Filters needed:
Eye Candy 4000 gradient glow
Penta.com-jeans

Dropshadow I use for this tut is: V&H 2, Opactiy 50, Blur 5.00, Color-Black

Let's get started:

Open Template. Shift-D to make copy. Close original. Delete Raster 7 & Flower layer. Image-Canvas size-750x750. Can resize later.

Add new laster layer move to bottom. Open paper 5. Apply mask. With this settings: Source luminance-Fit to canvas-Hide all mask-Invert unchecked. Click load-then merge group.

Click on the big square layer. Selections-select all-float-defloat. Open paper 1. Copy-paste as new layer-selections-invert-delete. Select none. Delet orginal template layer. Add dropshadow.

Click on left strip. Selections-select all-float-defloat. Open paper 9. Copy-paste as a new layer-selections-invert-delete. Select none. Delete original template. Apply gradient glow. Then dropshadow.

Click on right strip. Do the same steps as above.

Click on middle strip. selections-select all-float-defloat. Open paper 6. Copy-paste as a new layer-selections-invert-delete. Select none. Delete original template layer. Add gradient glow and dropshadow.

Click on small square. Selections-select all-float-defloat. Choice light color from your tube. If using the same tube like I did. Add #e2969a to your color palete. New raster layer-flood fill with #e2969a. Select none. Delete original tmeplate layer. Back to other layer apply Penta.com-jeans with this settings: amount 62, border width 4. Click ok.

Make top layer on your layer palete active. Copy-paste as new layer your tube. With eraser tool, erase the extra at the bottom of the tube. (See my tag for example). Add dropshadow.

Click on frame layer. Add gradient glow and dropshadow.

Click mask layer. Open element Glitter1. Copy-paste as a new layer. Make sure this layer is above the mask layer. Add dropshadow.

Click on top layer on your layer palete. Open Tag. Copy-paste as a new layer. Image-resize 40. Move to the left side of your tag. Image-free rotate-left 15.00-all layer unchecked. Add dropshadow.

Open flower1. Copy-paste as new layer. Resize 40 then resize again 60. (Look at my tag example for placement). Dropshadow.

Open flower2. Copy-paste as new layer. Resize 40 then resize again 50. Dropshadow. Duplicate flower (see my tag for placement).

Open dragonfly2. Copy-paste as new layer. Resize 50, 3x. Rotate 25.00 to right. Move to top right corner. Dropshadow.

Add your name. Dropshadow.
Addy your copyright info on tag.
Layers-merge-visible.
Save as a jpeg or png.

Thank you for trying this tutorial I hope you enjoyed it. I enjoyed making it.
This tutorial was created by Hunne at Hunne Designs, July 21, 2009.

Monday, July 20, 2009

The Natural Look


Image and video hosting by TinyPic
This tutorial was written for those that have the working knowledge of PSP.

Supplies Needed:

PSP 10 (or any version)
Tube of choice
I am using the artwork of ©Elias Chatzoudis. www.elias-design.gr which has to be purchased at MPT here. Please do not use his artwork without a licenses.

Template called "AMZ_Template3 made by Ziggy at ZiggyFan Scrap Designs which you can find it here.

PTU Scrap kit called " Natural Girl" made by Ziggy at ZiggyFan Scrap Designs with you can find it here.

Font: I am using Ziggy Zoe (or font of choice)

Filters Needed
Eye Candy 4000-Gradient Glow

Dropshadow used through out the tutorial. V&H 2, Opacity 50, Blur 5.00, Color-Black.

Let's get started:

Open Template. Shift-D to make copy. Close original. Delete raster 3 and raster 6. Image-Canvas Size-750x750. Can be resized later.

Click on raster 1. Selections-select all-float-defloat. Open paper 2. Copy-paste as a new layer-selections-invert-delete. Select none. Delete raster 1. Add dropshadow. Layer-duplicate. Make orignial the active layer. Adjust-Blur-Gaussian Blur, Radius-25.00.

Click copy of raster 4. Selections-select all-float-defloat. Open paper 7. Copy, paste as a new layer-select-invert-delete. Select none. Delete original layer. Add dropshadow.

Click on raster 4. Repeat above steps. Add dropshadow.

Click raster 5. Selections-select all-float-defloat. Open paper 8. Copy-paste as new a new layer-select-invert-delete. Select none. Delete original layer. Add dropshadow.

Click on copy raster 5. Repeat the same steps as above. Add dropshadow.

Click on raster 2. Using magic wand click the inside of the box. Open paper 4. Copy-paste as new layer-selections-invert-delete. Select none.

With magic wand click inside the sqaure again. Open tube. Copy-pastes as new layer-selections-invert-delete. Select none. Making sure that top raster laster layer is active. Paste your tube as a new layer over the first tube. (where it looks like she head is over the frame. At the bottom of the frame use eraser and erase all the extra that hangs out of the frame.) *Look at my tag for the example*. Add dropshadow to both tube images.

Make raster 2 active layer. Use magic wand, click the grey area of the square. Open paper 6. Copy-paste as new layer-selections-invert-delete. Delete raster 2. Add gradient glow. Settings: Glow width-3.00, Soft Corners-0, Opacity-100, Color-flat (which is white). Add dropshadow.

Add any elements you like. (or use my tag for example) Add dropshadow after you paste each element.

Add your name or saying and copyright info on tag.

Layers-merge. Save as a jpeg or png.

I hope you have enjoyed this tutorial. I had fun making it.

This tutorial was written by Hunne Designs. July 20th, 2009.

Sexy Pirate

Image and video hosting by TinyPic

Sexy Pirate

This tutorial was written for those that have the working knowledge of PSP.

Supplies Needed:
PSP 10 (or any version will work)Tube of choiceI am using the artwork of ©Elias Chatzoudis http://www.elias-design.gr/ whichcan be purchased at MPT here

Scrap kit "Sexy Pirate" by Lacarolita's Designsz here

Template "Pirate" by Hunne Designs here

Font "Arrr Matey BB or font of choice

Filters Needed
Eye Candy 4000-Gradient Glow

Let's get started

Open template. Shift-D, delete watermark and raster layer 1. Image-Canvas size 750x750. Can resize later.

Start at the bottom of the template and working upward. Click on the Top line layer. Selections-select all-float-defloat. Open paper 8. Copy-paste as new layer-resize 85%-Selections-invert-delete. Select none. Add gradient glow twice, then dropshadow. Delete template layer. Do the same to bottom line as you did above.

Click on the large circle layer. Selections-select all-float-defloat. Open paper 10. Copy-paste as new layer-selections-invert-delete. Select none. Delete template layer. Duplicate large circle. Click on original-Adjust-blur-Gaussian Blur-25. Click on copy. Add dropshadow.

Click on small circle layer. Selections-select all-float-defloat. Open paper 4. Copy-paste as new layer-selections-invert-delete. Select none. Delete template circle. Click back on circle again. Add gradient glow once. Dropshadow.

Click on the X layer. Selections-select all-float-defloat. Open paper 1. Copy-paste as new layer-selections-invert-delete. Select none. Delete X template.

Click on frame. With magic wand click inside frame. Selection-modify-expand 1. Open your tube. Copy-paste as new layer-selection-invert-delete. Move image down below frame. Low opacity to 60. Click back on frame add gradient glow and dropshadow.

Open tube again. Make sure you are on top layer. Copy-paste as new layer. Move to right side (see my tag for example). Dropshadow.

Click on wordart. Selections-select all-float-defloat. Open paper 7. Copy-paste as a new layer-selection-invert-delete. Delete wordart template. Add gradient glow twice. Dropshadow.

Add any elements you wish and dropshadow them. Or you can use my tag as example.

Add your name and copyright info. Save as a jpg or png.

Thank you for doing this tutorial. I hope you liked doing this. I would love to see any tutorials results. You can email them to mythodicspices@gmail.com.

Please do not copy, hotlink or claim this tutorial as your own. This tutorial was created by Hunne Designs on July 20th, 2009.

Friday, July 10, 2009

Juicy Elias Babe


Photobucket


This tutorial was written for those that have the working knowledge of PSP.

Supplies Needed:

PSP10 (or any version will work)
Tube of Choice
I am using the artwork by ©Elias Chatzoudis www.elias-design.gr which
can be purchased at MPT Here

My Template #7 which you can find on my blog site Here
Scrap kit called "Watermelon Crawl" by Juicy Bits Here

Font of choice or Font I am using "Century Gothic"

Filters used
Eye Candy 4000-Gradient Glow

Dropshadow for this tutorial setting I used are as followed
Effects-3D effects-dropshadow V&H 2, Opacity 25, Blur 3.00 Color Black

Please do not hotlink my tutorial blog, copy them or claim them as your own.

Let's Begin:

Open Template 7. Shift-D to copy. Delete original. Image-Canvas size 800x800. You can resize later. Delete my watermark.

Select Big Circle layer-selections-select all-float-defloat. Open up paper 10-copy-paste as new layer-selections-invert-delete. Select none. Now delete the big circle template layer. Go to layers-duplicate. Go back to orignial copy. Adjust-blur-Gaussian blur. Using Radius 10.00. Go to copy later and add dropshadow.

Select Strip 1 layer-selections-select all-float-defloat. Open up paper 1-copy-paste as new layer-selections-invert-delete. Select none. Now delete the strip 1 layer template. Add Effect-Eye Candy 4000-Gradient Glow. Setting width 3.00, Corners 0, Color Fat/white. Dropshadow.

Select strip 2 layer-selections-select all-float-defloat. Open up paper 4-copy-paste as new layer-selections-invert-delete. Select none. Now delete strip 2 layer template. Add the same gradient glow like above. Add the same dropshadow.

Select strip 3 layer-selections-select all-float-defloat. Open paper 6-copy-paste as new layer-selections-invert-delete. Select none. Now delete strip 3 layer template. Add the gradient glow and a dropshadow.

Select Strip 4 layer-selections-select all-float-defloat. Open paper 2-copy-paste as new layer-selections-invert-delete. Select none. Now delete strip 4 layer template. Add the gradient glow and dropshadow.

Select small circle layer-selections-select all-float-defloat. Open paper 9 copy-paste as new layer-selections-invert-delete. Select none. Now delete small circle template. Go to layers-duplicate. Go back to orignial copy. Adjust-blur-Gaussian blur. Using Radius 10.00. Go to copy later and add dropshadow.

Select square layer-selections-select all-float-defloat. Over on your color palatte. Set your foreground color to #e8a4bc if you the same tube I am. If not use the lights color. Go to layers-new raster layer. Flood fill with color.

Copy-paste as new layer your tube. Making sure its the top layer on your layer palatte. Using your eraser tool. Eraser anything hang over the bottom of the frame. Dropshadow.

Click frame layer-selections-select all-float-defloat. Open paper 4-copy-paste as new layer-selection-invert-delete. Select none. Now delete frame template. Use dropshadow.

Add any elements you wish or look at my for ideas.

Add your name.

Copyright info.

Go to layers-merge-visible. Resize and save as a png or jpeg.

Wednesday, July 8, 2009

Be A Star


Photobucket


This tutorial was written for those that have the working knowledge of PSP.

Supplies Needed:
PSP10 (any version will work)
Tube of choice
I used artwork by ©Elias Chatzoudis www.elias-design.gr
which you can purchase at MPT Here
Do not use his work unless your a license holder with MPT.

My Template #4 which you can find it at Hunne Designs Here
Scrap kit called "For Mariah" by Bluedream Designs which you can
find here

Font I used is AL Sandra which you can get here
Or you can use any font of your choice.

Filters used:
Eye Candy 4-Gradient Glow

Please do not hotlink my tutorials, copy them or claim them as your own.

Dropshadow for this tutorial setting I used are:
Effects-3D effects-dropshadow V&H 2, Opacity 25, Blur 3.00 Color
Black

Let's Begin

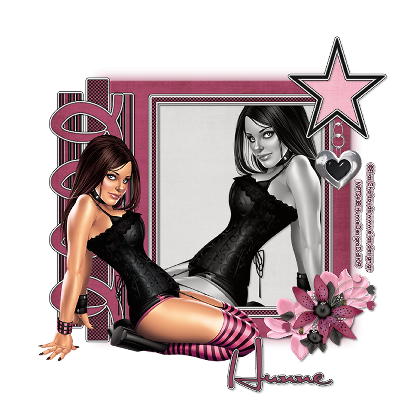
Open up Template 4, Hold down (Shift-D) to copy. Delete original.
Imaged-Canvas size: Width & Height 800 x 800. You can resize
later. Delete the background & watermark.

Select big rectangle layer-selections-select all-float-defloat. Open up
paper 1-copy-paste as new layer-selections-invert-delete. Select
none. Now delete the template rectangle layer. Go to effects-Eye
candy 4000-Gradient glow. Using these settings width-3.00 soft
soft corners-0. Color flat-white. Click ok. Do gradient glow again
with same setting but changing color to black.

Select smaller rectangle layer-selections-select all-float-defloat.
Open paper 3-copy-paste as new layer-selections-invert-delete.
Select none. Now delete the smaller rectangle template layer. On
the same layer click selections-select all-float-defloat. Place tube
resize if needed. Please look at mine for example. After you have
your tube in place. Click selections-invert-delete-select none. Drop
shadow tube. Now go over to layer palette click on-luminance.


Click on Frame layer-Selections-select all-float-defloat.Open paper
5-copy-paste as new layer-selections-invert-delete.Select none. Now
delete the template frame layer. No apply gradient glow twice like before.
Now dropshadow.

Click on the left layer-selections-select all-float-defloat. Open paper
7-copy-paste as new layer-selections-invert-delete. Select none. Now
delete the left template layer. Use gradient glow twice again. Dropshadow.

Click on the right layer-selections-select all-float-defloat. Open paper 7 again.
Copy-paste as new layer-selections-invert-delete. Select none. Now delete the
right template layer. Use gradient glow twice like above. Dropshadow.

Click on middle layer-selections-select all-float-defloat. Open paper 5-copy-
paste as new layer-selections-invert-delete. Select none. Now delete the middle
template layer. Use gradient glow & dropshadow.


Click on the swirl layer-selections-select all-float-defloat. Open paper 1-copy-
paste as new layer-selections-invert-delete. Select none. Now delete the swirl
template layer. Use gradient glow and dropshadow.

Click on the star layer-selections-select all-float-defloat. Open paper 4-copy-
paste as new layer-selections-invert-delete. Select none. Move down below
the star frame. Now delete the star template layer.

Click the star frame layer-selections-select all-float-defloat. Open paper 2-copy
paste as new layer-selections-invert-delete. Select none. Now delete the star
template layer. Use gradient glow and dropshadow.


Click on the top layer of palette. Apply tube-resize to your like. Click Image-mirror.
Look at my tag for example. Place dropshadow.

Add elements and dropshadow. Use my tag as example. Or add elements of your
liking.

Added copyright info. If using a PTU artist. Click layers-merge visible.

Crop or resize save as a jpeg or png.

Thank you for trying my very first tutorial. I hope you enjoyed.

If you have any questions or comments please feel free to email me at. (mythodic.spices@gmail.com or give a comment on my blog).