

This tutorial was written for those that have the working knowledge of PSP.
Supplies Needed:
PSP10 (any version will work)
Tube of choice
I used artwork by ©Elias Chatzoudis www.elias-design.gr
which you can purchase at MPT Here
Do not use his work unless your a license holder with MPT.
which you can purchase at MPT Here
Do not use his work unless your a license holder with MPT.
My Template #4 which you can find it at Hunne Designs Here
Scrap kit called "For Mariah" by Bluedream Designs which you can
find here
Scrap kit called "For Mariah" by Bluedream Designs which you can
find here
Font I used is AL Sandra which you can get here
Or you can use any font of your choice.
Filters used:
Eye Candy 4-Gradient Glow
Please do not hotlink my tutorials, copy them or claim them as your own.
Dropshadow for this tutorial setting I used are:
Effects-3D effects-dropshadow V&H 2, Opacity 25, Blur 3.00 Color
Black
Effects-3D effects-dropshadow V&H 2, Opacity 25, Blur 3.00 Color
Black
Let's Begin
Open up Template 4, Hold down (Shift-D) to copy. Delete original.
Imaged-Canvas size: Width & Height 800 x 800. You can resize
later. Delete the background & watermark.
Select big rectangle layer-selections-select all-float-defloat. Open up
paper 1-copy-paste as new layer-selections-invert-delete. Select
none. Now delete the template rectangle layer. Go to effects-Eye
candy 4000-Gradient glow. Using these settings width-3.00 soft
soft corners-0. Color flat-white. Click ok. Do gradient glow again
with same setting but changing color to black.
Select smaller rectangle layer-selections-select all-float-defloat.
Open paper 3-copy-paste as new layer-selections-invert-delete.
Select none. Now delete the smaller rectangle template layer. On
the same layer click selections-select all-float-defloat. Place tube
resize if needed. Please look at mine for example. After you have
your tube in place. Click selections-invert-delete-select none. Drop
shadow tube. Now go over to layer palette click on-luminance.
Click on Frame layer-Selections-select all-float-defloat.Open paper
5-copy-paste as new layer-selections-invert-delete.Select none. Now
delete the template frame layer. No apply gradient glow twice like before.
Now dropshadow.
Click on the left layer-selections-select all-float-defloat. Open paper
7-copy-paste as new layer-selections-invert-delete. Select none. Now
delete the left template layer. Use gradient glow twice again. Dropshadow.
Click on the right layer-selections-select all-float-defloat. Open paper 7 again.
Copy-paste as new layer-selections-invert-delete. Select none. Now delete the
right template layer. Use gradient glow twice like above. Dropshadow.
Click on middle layer-selections-select all-float-defloat. Open paper 5-copy-
paste as new layer-selections-invert-delete. Select none. Now delete the middle
template layer. Use gradient glow & dropshadow.
Click on the swirl layer-selections-select all-float-defloat. Open paper 1-copy-
paste as new layer-selections-invert-delete. Select none. Now delete the swirl
template layer. Use gradient glow and dropshadow.
Click on the star layer-selections-select all-float-defloat. Open paper 4-copy-
paste as new layer-selections-invert-delete. Select none. Move down below
the star frame. Now delete the star template layer.
Click the star frame layer-selections-select all-float-defloat. Open paper 2-copy
paste as new layer-selections-invert-delete. Select none. Now delete the star
template layer. Use gradient glow and dropshadow.
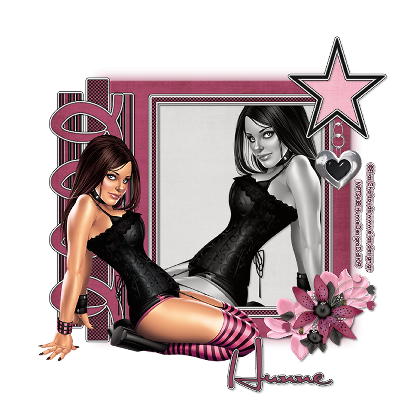
Click on the top layer of palette. Apply tube-resize to your like. Click Image-mirror.
Look at my tag for example. Place dropshadow.
Add elements and dropshadow. Use my tag as example. Or add elements of your
liking.
Added copyright info. If using a PTU artist. Click layers-merge visible.
Crop or resize save as a jpeg or png.
Thank you for trying my very first tutorial. I hope you enjoyed.
If you have any questions or comments please feel free to email me at. (mythodic.spices@gmail.com or give a comment on my blog).


No comments:
Post a Comment